Quick Answer
Fixing irrigation leaks starts with finding the exact leak type and location before you replace anything. Check the meter, run each zone, watch for pooling, misting, or pressure drop, then match the repair to the problem: head, drip line, valve, or buried pipe. If you keep patching symptoms, you'll miss the actual cause. For a broader yard care perspective, see why some outdoor fixes go wrong when they're rushed.
A sudden wet patch in the lawn, a sprinkler that hisses instead of sprays, or a water bill that doesn't make sense usually points to the same problem. You're already in the right place if you're trying to sort out fixing irrigation leaks without tearing up half the yard.
Some repairs are simple. A cracked nozzle or damaged drip line can often be handled in one session. Other leaks are only the visible symptom of bad pressure, buried pipe damage, or aging components, which is why water conservation in landscaping starts with diagnosis, not guesswork.
How to Diagnose Your Irrigation Leak Correctly

Most failed DIY leak repairs go wrong before the repair starts. The mistake isn't usually bad effort. It's replacing the wrong part.
In real irrigation work, the first question isn't "How do I fix this?" It's "What is leaking?" 30–60% of irrigation water is wasted due to common system issues like leaks, and a single broken sprinkler head can leak up to 25,000 gallons per year. That's why a small-looking issue in Monterey County deserves a careful check.
Start with the meter and controller
If you suspect a leak, turn off all indoor and outdoor water uses you can control. Then check the water meter. If the leak indicator is still moving, water is going somewhere.
After that, run the irrigation system one zone at a time from the controller. Don't try to inspect the whole property at once. Zone-by-zone testing tells you whether the issue is isolated or system-wide.
A good general reference on leak confirmation methods outside irrigation is this guide to professional Atlanta leak detection services. The process is different for outdoor irrigation systems, but the core idea is the same. Confirm the leak first, then narrow the location.
Watch for pattern clues, not just water
When a zone runs, don't only look for obvious spray. Watch how the zone behaves.
- Gushing at one head usually means a cracked body, split fitting, or missing nozzle.
- A soggy spot between heads often points to a lateral line leak underground.
- Weak spray across several heads can mean pressure loss, a valve issue, or a bigger break upstream.
- One dry area next to standing water usually means water is escaping before it reaches the intended head.
- Misting or fogging often indicates high pressure or a damaged nozzle.
Practical rule: If the wettest spot isn't where the problem part sits, keep tracing the line. Water often travels through Monterey County soils before it shows at the surface.
Check local conditions before you dig
In Salinas and across Monterey County, soil matters. Clay-heavy areas can hold water and spread saturation sideways, which makes the leak appear farther from the break. Sandy sections drain faster and may hide a leak until pressure loss becomes obvious.
Use flags, paint, or even a screwdriver pushed lightly into the soil to mark the edges of saturation before digging. That gives you a cleaner picture of where the break probably sits and helps avoid opening a trench in the wrong place.
Repairing Common Leaks at Sprinkler Heads
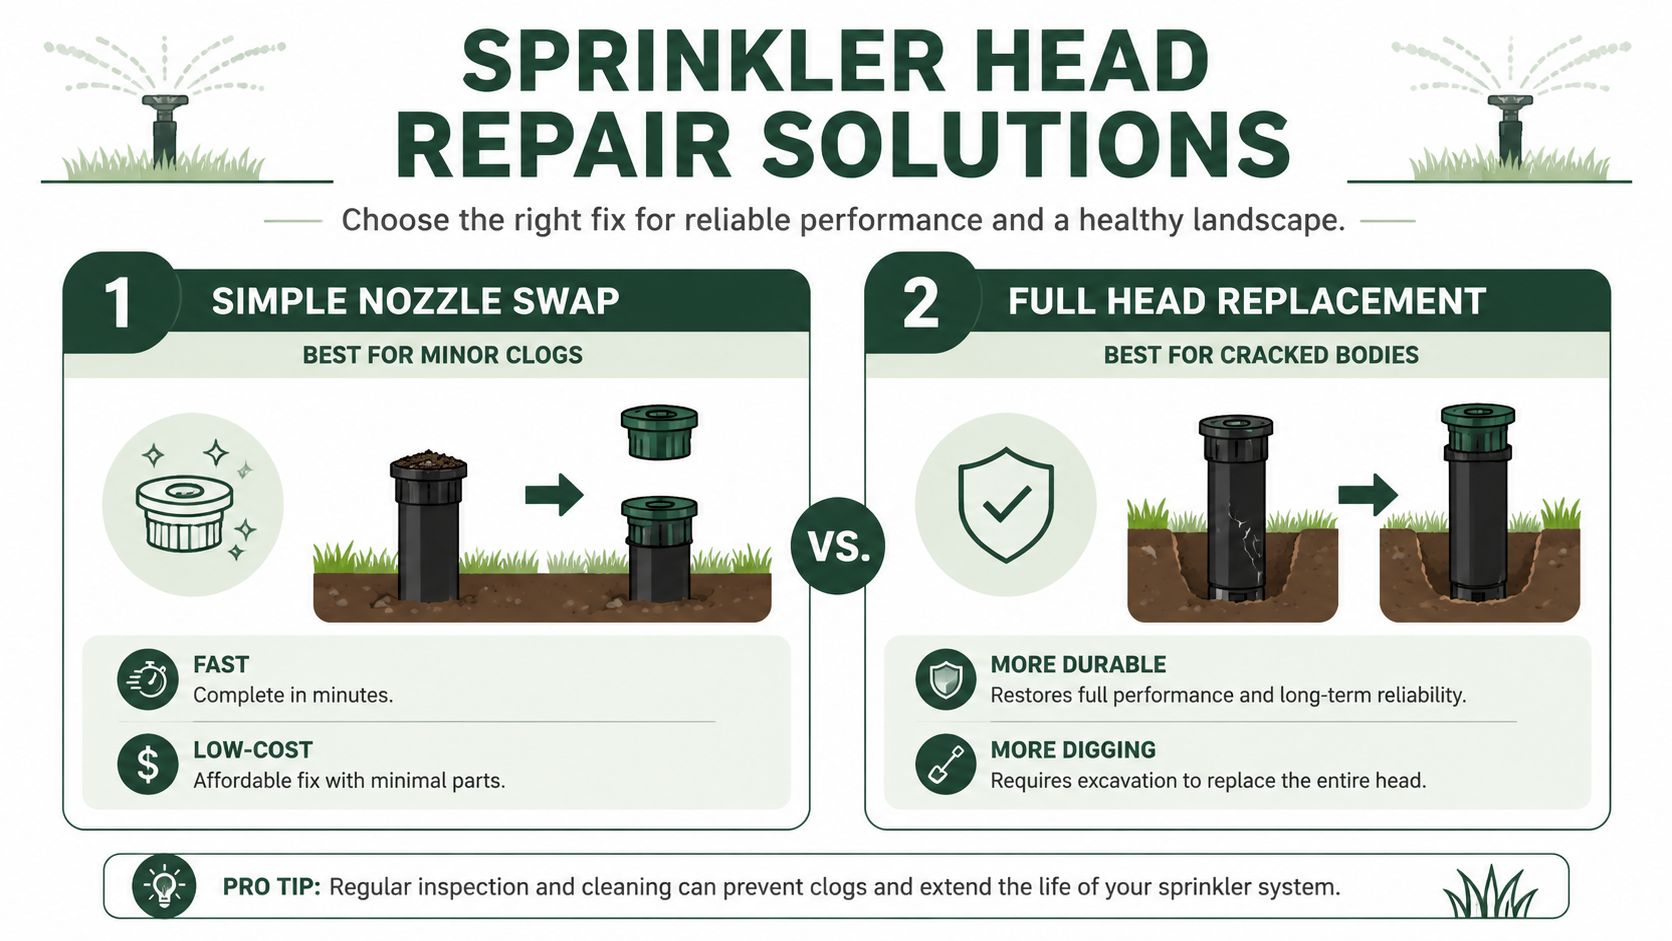
Sprinkler head leaks are the most approachable repairs for a capable property owner. They also get misdiagnosed all the time. A bad spray pattern doesn't always mean the whole head is bad.
When a nozzle swap is enough
If the head rises and seals properly but sprays unevenly, throws water onto pavement, or has a visibly damaged opening, start with the nozzle. On many spray heads, the nozzle unscrews with a small tool or screwdriver.
Shut off the zone first. Pull the riser up, remove the nozzle, and flush the line briefly before installing the replacement. That flush matters because grit left in the line can clog the new nozzle right away.
A nozzle-only fix makes sense when:
- The body is intact and there's no crack around the cap or side wall.
- The riser still pops up cleanly instead of sticking low.
- The leak is coming from the spray opening rather than the base.
When the whole head should be replaced
Replace the full head if water bubbles around the base, the cap is split, the threads are damaged, or lawn equipment has broken the assembly off-center. In those cases, changing only the nozzle wastes time.
Dig carefully around the head by hand so you don't damage the funny pipe or lateral connection. Unscrew the old head while holding the fitting below if you can reach it. Match the replacement by type, pattern, and height, then set the new head at finished grade so it won't sit too high or too low after backfill.
If a head keeps breaking in the same spot, stop replacing the head and look at grade, traffic, edging equipment, and riser alignment.
A quick comparison of common head repairs
| Problem you see | Likely fix | DIY-friendly |
|---|---|---|
| Crooked spray, clogged fan, poor arc | Nozzle cleaning or replacement | Yes |
| Crack in body or leak at cap/base | Full head replacement | Yes |
| Head sits too low after settling | Riser adjustment or rebuild | Usually |
| Water pooling around several nearby heads | Upstream pipe or fitting diagnosis | Sometimes |
One more point matters in fixing irrigation leaks at heads. Align the pattern after the repair. A new head installed wrong can waste water even if it no longer leaks.
Fixing Underground Lateral Line Leaks
Buried lateral line leaks are where a lot of homeowners get in trouble. The repair itself isn't mysterious. The trouble comes from digging too fast, cutting too short, or trying to force a patch onto pipe that wasn't prepared correctly.
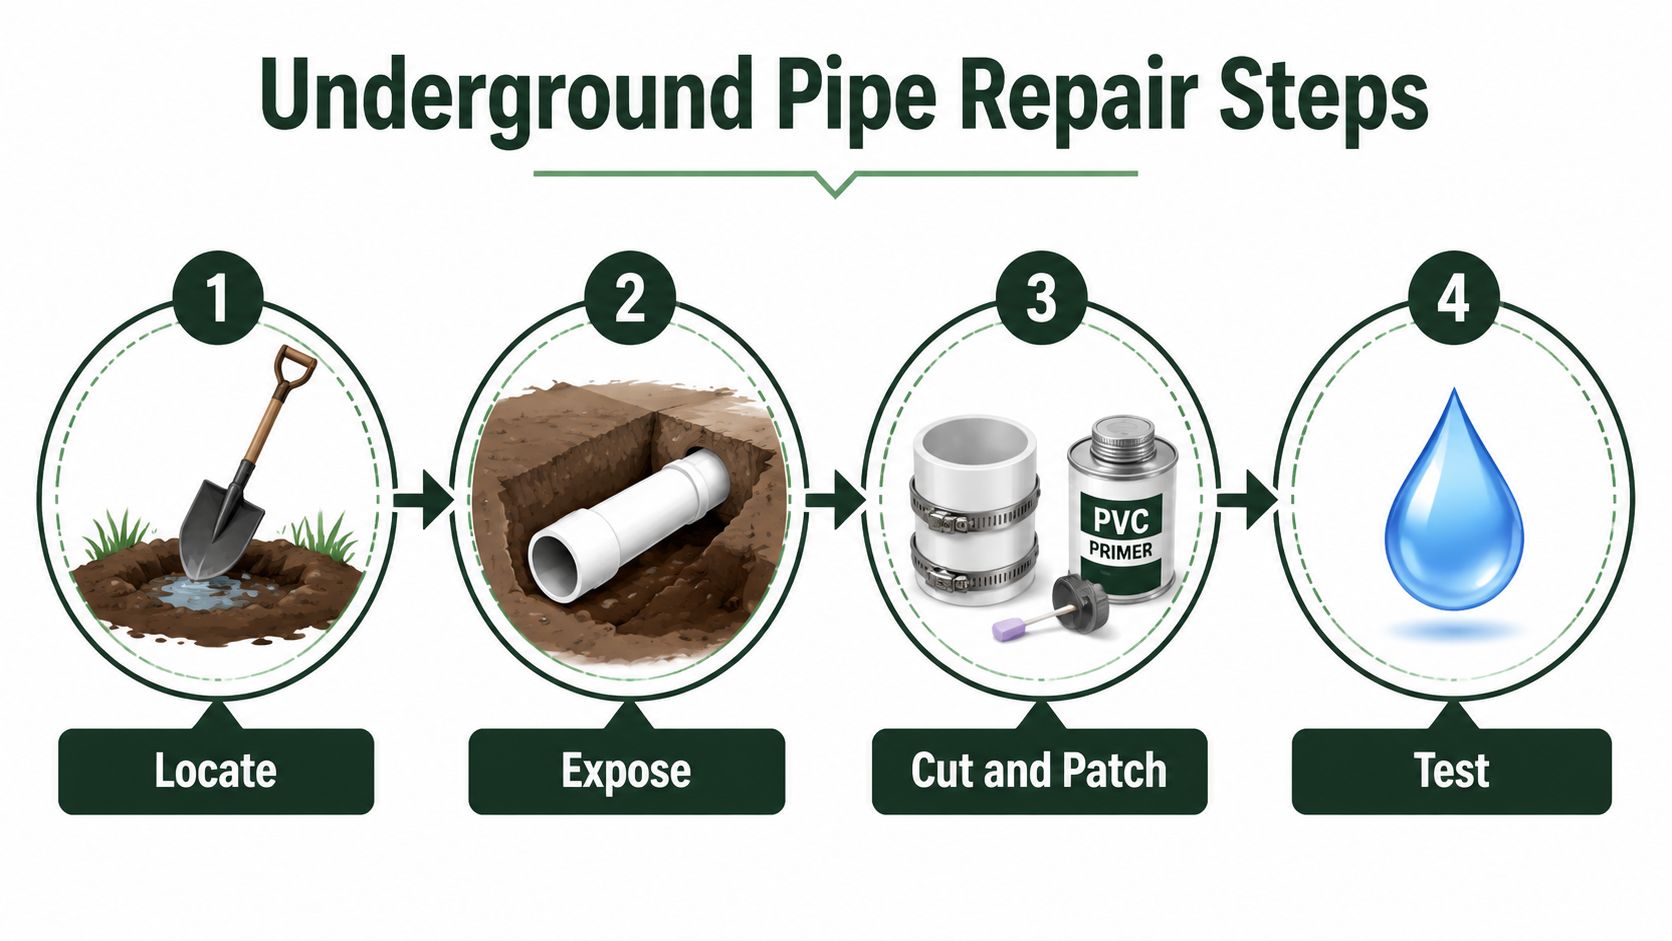
How to expose the damaged pipe without making it worse
Once you've identified the likely leak area, shut off the water. Dig by hand around the wet spot and widen the opening until you can see healthy pipe on both sides of the damage.
Don't jam a shovel straight into saturated soil. That's how a small leak turns into two. In Monterey County clay, soil often clings to the pipe, so rinse or wipe it clean enough to inspect the full crack or puncture before cutting.
The repair that usually holds
For PVC lateral lines, the standard repair is to cut out the bad section and install a replacement piece with a telescopic slip coupling. For underground PVC pipe repairs, after cutting out the damaged section, use a telescopic slip coupling, prime the pipe and fitting with PVC purple primer, and use solvent cement, allowing it to cure for 20-30 minutes at 70°F before testing the system at full pressure.
That cure time is where people get impatient. If you test too early, the joint may seem fine for a moment and then seep later under normal cycling.
Use this sequence:
- Cut cleanly with a tubing cutter or PVC cutter so the pipe ends are square.
- Dry-fit the parts before using primer or cement.
- Prime and cement both the pipe and fitting surfaces.
- Seat the slip coupling fully and hold it in place long enough for the joint to set.
- Wait for cure time before pressure testing.
What works and what doesn't
A proper splice works. Tape wrapped around a pressurized buried line doesn't. Rubber clamp patches have a place as a short-term hold on the right material, but they aren't my first choice for an irrigation lateral that cycles repeatedly.
Backfill matters too. Remove sharp rocks, compact gently in lifts, and make sure the repaired section isn't left hanging in a void. If the pipe can flex unsupported, the joint will carry stress it shouldn't.
In clay soil, a clean repair can still fail early if you bury it against hard debris or leave the pipe twisted under tension.
If the break is close to a tee, under hardscape, or tied into multiple lines at odd angles, that's where DIY repairs stop being efficient.
Addressing Drip System and Valve Leaks
Drip systems and valves fail in very different ways. Drip leaks are usually visible once you slow down and inspect the line. Valve leaks are more deceptive because the wet area may sit around the box while the actual problem is inside the assembly.
Drip line repairs that are usually worth doing yourself
For a nicked or cut drip tube, cut out the damaged section and join the two clean ends with a barbed coupler. For a small emitter hole or pinhole in the wrong place, a goof plug is the normal fix.
Use a sharp cutter, not pruning shears. Jagged tubing ends don't seat well and tend to weep. After the repair, run the zone and check every nearby fitting because one visible leak often means the tubing has been stressed elsewhere too.
Common drip leak causes include:
- Sun exposure on tubing that wasn't covered properly
- Tool damage from weeding or planting
- Rodent chewing around mulch beds
- Loose fittings at transitions and emitter connections
If you're updating an older system, this overview of water-wise irrigation trends for homeowners is useful for deciding whether a patch makes sense or whether the zone needs a broader refresh.
Valve leaks require a different kind of diagnosis
A leaking valve usually shows up as a zone that won't shut off cleanly, constant moisture in the valve box, or heads that continue to dribble after the cycle should be over. Sometimes debris is trapped in the diaphragm. Sometimes the solenoid isn't seating properly. Sometimes the valve body itself is worn.
Start with basic checks:
- Open the valve box and inspect for standing water
- Look for loose wires or damaged waterproof connectors
- Clean out dirt before opening the valve
- Check whether the zone shuts off manually at the controller
If the problem is inside the valve, disassemble carefully and keep the parts in order. If the diaphragm is torn, warped, or packed with debris, replace it with the correct match. If the valve manifold is crowded, glued rigidly, or tied into electrical issues, it's usually smarter to stop there.
A valve that leaks only sometimes is often harder to diagnose than one that fails completely. Intermittent symptoms usually mean debris, pressure fluctuation, or partial internal wear.
A Proactive Approach to Irrigation Maintenance
The easiest leak to repair is the one you catch before it turns into a washout, dead plant material, or a damaged walkway edge. Preventive maintenance isn't complicated. It just needs to be regular.
Polyethylene irrigation lines can degrade from UV and thermal exposure, with manufacturers recommending replacement every 10–15 years. Regular inspections help you catch brittleness, weak points, and shallow exposed runs before they split in hot weather.
A simple seasonal routine that actually helps
In spring, run every zone and watch the full cycle. Check head alignment, clogged nozzles, uneven pressure, valve boxes, drip connections, and any exposed tubing. Flush lines where debris may have collected.
During the watering season, walk the property after a cycle. Look for soft spots, unusual plant stress, pavement overspray, and heads that don't retract properly.
Before hotter weather settles in, inspect older poly lines in sun-exposed beds and around slope transitions. If you're comparing layouts or planning upgrades, this guide to compare lawn irrigation options is a decent starting point for thinking through coverage and component choices.
Older systems need closer attention
A system doesn't have to be failing everywhere to justify a maintenance visit. One aging line, one recurring valve issue, or one area with repeated root pressure is enough to justify a closer look.
For property owners considering equipment changes, smart sprinkler system options can also help reduce the scheduling problems that often hide leaks or make them harder to catch.
Walking the yard while each zone runs tells you more than staring at the controller ever will.
When to Call a Professional for Irrigation Repairs
There comes a point where more DIY effort just means more disturbed soil and more replacement parts. If you're still not sure where the water is escaping, stop digging and reassess.
While a DIY repair may cost $5–$50 in parts, an undetected underground leak can waste 5–20 gallons per day, costing over $100 monthly in water charges in some California areas, and a professional audit can identify systemic issues that a simple patch does not address. That is the essential trade-off. The question isn't only whether you can patch one leak. It's whether you're fixing the whole problem.
Call a professional when you see any of these conditions:
- Multiple leaks at once, which often points to pressure issues or broader system wear
- Leaks near the main supply or backflow area, where mistakes carry more risk
- Electrical or controller-related symptoms, including zones that start or stop inconsistently
- A failed first repair, especially on buried pipe or manifolds
- Water moving under paving, retaining edges, or structural areas
In Salinas and across Monterey County, water regulations make delay more expensive than it used to be. A proper inspection can also help if you're already considering a larger change to coverage, layout, or water use. This article on what Salinas homeowners should know before changing their irrigation system is worth reading before you replace components piecemeal.
Frequently Asked Questions About Fixing Irrigation Leaks
How do I know if my irrigation leak is underground?
Look for a soggy area that stays wet even when the surface heads look normal, or for a zone that loses pressure without an obvious broken head. Another clue is water movement at the meter when the irrigation system should be off and no other fixtures are running.
Can I fix a leaking sprinkler head myself?
Usually, yes. If the problem is a nozzle, cap, or cracked head body, many property owners can handle it with basic hand tools and a matching replacement part. The key is making sure the leak is located at the head and not in the fitting or pipe below it.
Why does my valve box stay wet all the time?
A wet valve box usually means the valve is leaking internally, a fitting inside the box is dripping, or water is entering from a nearby underground leak. Clean the box first and inspect during a cycle so you can tell whether the moisture is old standing water or active leakage.
Are drip line leaks easier to repair than PVC pipe leaks?
Most of the time, yes. A drip line cut or pinhole is often a straightforward coupler or goof plug repair. Buried PVC leaks take more care because the pipe has to be exposed, cut cleanly, glued properly, and tested after cure time.
Should I keep patching an old irrigation system?
If leaks keep showing up in different places, repeated patching stops making sense. At that stage, the issue is often system age, shallow installation, pressure problems, or material breakdown in one section after another.
How long does fixing irrigation leaks usually take?
Simple head or drip repairs can be quick once you've confirmed the exact cause. Buried line and valve work takes longer because diagnosis, excavation, proper assembly, and testing matter more than speed.
Call to Action
If you're dealing with fixing irrigation leaks, start with diagnosis and don't rush the repair. Small problems are often manageable, but buried pipe damage, recurring leaks, and valve issues are better handled with a trained eye.
If you want help tracking down or repairing irrigation leaks in Salinas or anywhere in Monterey County, contact California Landscape & Tree Pros for an estimate or consultation at (831) 998-7964 in Salinas or (831) 905-8018 in Monterey. You can also visit them at 1184 Monroe St., Suite 6, Salinas, CA 93906.