AI Answer Block: Many homeowners wonder if they can save money on outdoor projects by doing it themselves. However, recent insights show that 65% of homeowners hire pros for major projects — and over 70% of large outdoor upgrades are not DIY due to safety, complexity, and long-term performance issues. What this actually means for you is that the typical homeowner risks higher long-term costs when attempting major projects alone — from irrigation mistakes that kill plants to structural issues in patios, drainage failures, or unsafe tree work. Professional installation protects your investment and ensures the space is usable, safe, and built to last. Before starting any outdoor upgrade, assess three things: irrigation demands, structural requirements, and safety risks (especially near trees). If any of these exceed your comfort level — or could impact property value — bring in a licensed pro.
The ambition to create a beautiful, functional outdoor space is a powerful motivator for any homeowner. The desire to save money often leads down the path of DIY projects, from pruning a troublesome tree branch to installing a new paver patio. While the satisfaction of a job well done is rewarding, the reality is that many well-intentioned efforts can go wrong, leading to costly fixes, safety hazards, and a yard that falls short of your vision. This is why many people ultimately learn to stop DIYing your yard wrong and instead learn the right way to approach outdoor projects.
1. Improper Tree Pruning Techniques Leading to Disease and Structural Failure
One of the most damaging mistakes a homeowner can make is taking a DIY approach to tree pruning without understanding the science behind it. Improper cuts do more than just look bad; they actively harm the tree by creating wounds that won't heal properly. This is why it’s a crucial first point in any guide on how to stop diying your yard wrong. Cutting too close to the trunk (a flush cut), leaving a long stub, or removing too much of the leafy canopy at once can invite pests, disease, and lead to serious structural weakness.
For instance, a homeowner in Carmel might make a flush cut on a mature Coast Live Oak, slicing into the branch collar and exposing the tree's core wood. Within a couple of seasons, this wound can develop canker, rot, and become an entry point for insects, turning a beautiful heritage tree into a hazard. The same applies to over-pruning. Removing more than 25% of the canopy stresses the tree, causing sunscald on the bark and triggering a panic response of weak, fast-growing shoots called water sprouts.
The Corrective Approach: Pruning for Health and Safety
Proper pruning is about making precise, deliberate cuts that work with the tree's natural defense system. The goal is to remove dead, diseased, or crossing branches while maintaining structural integrity.
- Locate the Branch Collar: Before you cut, find the slight swelling where the branch meets the trunk. This area contains specialized cells that will seal the wound. Never cut into it.
- Use the Three-Cut Method: For branches over an inch in diameter, make three cuts to prevent the bark from tearing. First, an undercut several inches from the trunk. Second, a top cut farther out to remove the branch's weight. Finally, make the clean, final cut just outside the branch collar.
- Angle for Drainage: The final cut should be angled slightly, about 45 degrees, sloping away from the trunk to allow water to run off instead of pooling.
Key Insight: Avoid "lion-tailing," which is stripping all the interior branches and leaving foliage only at the tips. This practice ruins the tree's natural form, weakens branches, and concentrates weight at the ends, making them more likely to break in Monterey County’s coastal winds.
When to Call a Certified Arborist
While trimming small ornamental trees or shrubs is a manageable DIY task, anything larger requires professional skill. If a tree is over 15 feet tall, near power lines, or has large, storm-damaged limbs, the risks are too high. Certified arborists have the training, insurance, and equipment to work safely at height. They understand the specific needs of local species, from Monterey Pines to California Sycamores, and know that real expertise is required for proper care, especially when dealing with storm-weakened trees where DIY pruning can be dangerous.
2. Poor Irrigation System Design Wasting Water and Creating Dead Zones
A poorly planned irrigation system is one of the most common ways homeowners unknowingly damage their landscape and waste a precious resource. Many DIY installations fail to account for critical variables like water pressure, soil type, sun exposure, and the specific needs of different plants. This oversight is a primary reason to stop diying your yard wrong, especially in water-conscious California. The result is often a system that mixes sprinkler types on the same line, over-waters some areas while leaving others parched, and ultimately wastes up to 50% of the water applied.

For example, a Salinas homeowner might set a uniform schedule to water their entire yard three times a week. This approach creates soggy, low-lying patches in the lawn that invite fungal disease and root rot, while drought-tolerant Mediterranean plants like lavender and rosemary in the same zone suffer from chronic over-watering. Another frequent mistake is combining rotary heads (which apply 0.5 inches per hour) with spray nozzles (which apply 1.5-2.0 inches per hour) on the same zone, leading to drastically uneven coverage and dead spots.
The Corrective Approach: Designing for Efficiency and Plant Health
A properly designed system delivers the right amount of water exactly where it's needed, improving plant health and significantly reducing water bills. This involves hydrozoning, or grouping plants with similar water requirements together, and matching irrigation components to the task.
- Zone by Water Needs: Create separate irrigation zones for different plant types. Turfgrass requires its own zone, separate from shrubs, perennials, and vegetable gardens.
- Use Matched Precipitation Rates: Ensure all sprinkler heads or emitters on a single zone apply water at the same rate. This guarantees uniform coverage and prevents one area from being flooded while another stays dry.
- Install a Smart Controller: Modern smart controllers automatically adjust watering schedules based on local weather data, seasonal changes, and even input from soil moisture sensors. Programming one to decrease watering by 50% or more during the Monterey Bay’s rainy winter season is a simple, effective conservation step.
Key Insight: Run your irrigation system in the early morning, between 4 a.m. and 8 a.m. Watering during this window minimizes water loss from wind and evaporation, allowing more moisture to reach the plant root zones. Also, check your local water district’s guidelines for any day-of-the-week or time restrictions.
When to Call a Water-Wise Irrigation Professional
While replacing a single sprinkler head is a simple DIY fix, designing or overhauling an entire irrigation system requires specialized knowledge. A professional can conduct an irrigation audit to identify inefficiencies and create a plan that addresses your property’s unique layout, soil, and plant palette. They understand how to correctly calculate water pressure, select the right components, and ensure your system complies with California’s water conservation mandates. Investing in expert design from the start prevents costly plant loss and drastically cuts water waste. You can also explore some of the latest water-wise irrigation trends homeowners should watch in 2026 to make your system even more efficient.
3. Incorrect Soil Preparation and Amendments Causing Poor Plant Establishment
Building a healthy, thriving yard starts from the ground up, yet many DIY landscapers skip the most fundamental step: preparing the soil. Planting directly into unprepared ground without understanding its composition is a common mistake and a key reason why you need to stop diying your yard wrong. Native California soils, especially in the Monterey Bay area, can be high in clay, sandy, or lacking in essential organic matter. Without proper amendment, plant roots struggle to establish, leading to wasted water, money, and effort.
Consider a Salinas homeowner who plants a row of expensive shrubs directly into compacted clay. Despite diligent watering, 70% of the plants are dead within six months. The dense clay trapped water, creating anaerobic conditions that suffocated the roots. Another common failure is piling mulch 6 inches high against a tree's trunk, a practice known as "volcano mulching." This creates a perfect environment for moisture-loving diseases and encourages girdling roots, slowly killing the tree over 3-5 years. Proper soil preparation can mean the difference between 90% plant survival and a 40-60% failure rate.
The Corrective Approach: Building Soil for Success
The right way to prepare your soil involves understanding its unique texture and chemistry, then amending it to create a welcoming environment for new plants. This ensures roots can penetrate deeply, access nutrients, and receive the right amount of water.
- Test Your Soil First: Before adding anything, conduct a soil test. You can get a kit from a local county extension office like the UC Davis Soil & Plant Laboratory to learn about your soil's pH, texture (clay, sand, loam), and nutrient levels.
- Loosen and Amend: Break up compacted native soil to a depth of 12-18 inches. For heavy clay soils common in the region, mix 2-3 inches of quality compost into the top 6-8 inches of the planting bed. This improves structure and adds vital organic matter.
- Improve Drainage: In heavy clay, adding materials like perlite or coarse sand (about 20% by volume) can drastically improve drainage and prevent root rot. For sandy soils, compost helps retain moisture.
- Mulch Correctly: Apply a 2-3 inch layer of organic mulch over the soil surface, but always keep it 4-6 inches away from the trunks of trees and shrubs to prevent disease and decay.
Key Insight: Simply digging a hole in clay and filling it with amended soil creates a "clay pot" effect. Water will collect in the hole and drown the plant. The goal is to amend the entire planting bed, not just individual holes, to encourage widespread root growth.
When to Call a Landscape Professional
While amending a small flower bed is a manageable DIY project, larger-scale soil correction requires expertise and equipment. If you are dealing with severely compacted soil from construction, poor drainage across a large area, or are planning a significant landscape installation, a professional is necessary. Landscape contractors have access to high-quality bulk amendments, tools like tillers and augers, and the knowledge to correctly grade land for proper water flow. They understand the specific soil profiles from Pebble Beach to Santa Cruz and can ensure your investment in new plants is built on a solid foundation, protecting it for years to come.
4. Hardscape Installation Without Proper Drainage and Foundation Planning
A beautiful paver patio or sturdy retaining wall can be a fantastic addition, but a DIY approach without proper engineering is a recipe for failure. This is a primary example of how homeowners stop diying their yard wrong by focusing on the surface appearance while neglecting the critical foundation beneath. Projects like patios, walkways, and walls often fail within a few years because of an inadequate base, poor drainage, and a misunderstanding of soil mechanics. The result is cracked concrete, sunken pavers, and leaning walls that create tripping hazards and require expensive tear-outs.
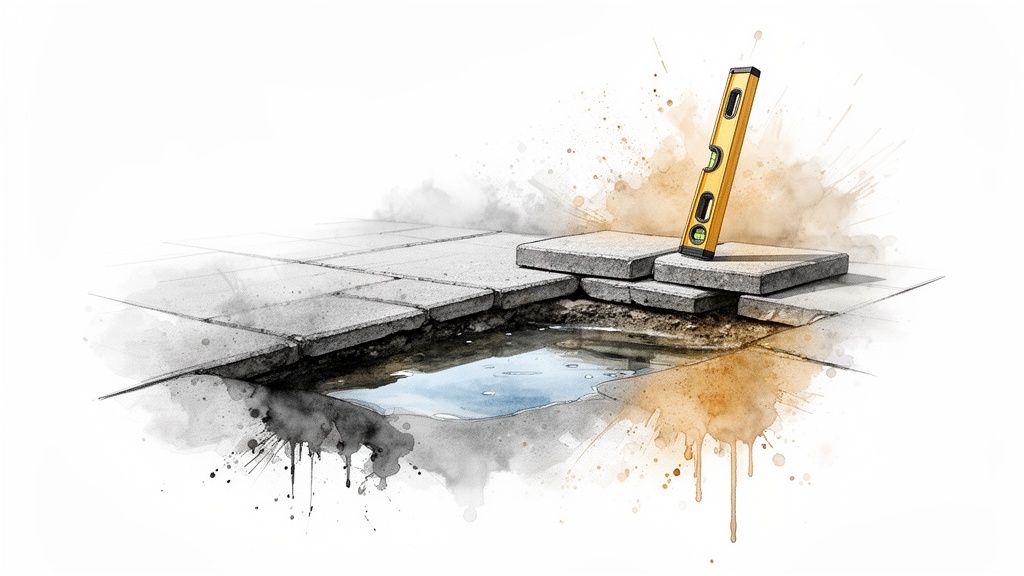
Consider a Pacific Grove homeowner who lays pavers directly on an inch of sand over unprepared soil. After the first winter’s rains and the region’s freeze-thaw cycles, the pavers begin to sink and shift unevenly. Another common scenario involves a DIY retaining wall built without a proper base or drainage pipe. Hydrostatic pressure builds behind the wall, causing it to bow and eventually collapse. These are not just aesthetic issues; they are structural failures that compromise safety and property value. When embarking on hardscape projects, it's also crucial to understand how to properly build a gravel shed foundation the right way, as similar principles of base preparation and stability apply to ensure longevity.
The Corrective Approach: Building a Foundation That Lasts
A successful hardscape project is built from the ground up with meticulous preparation. The key is to create a stable, well-draining base that can support the structure and withstand environmental pressures for decades.
- Proper Excavation and Base: A lasting patio requires excavating 6-8 inches for a 4-6 inch compacted gravel base. This base, typically made of crushed rock, must be compacted in layers to 95% standard proctor density with a plate compactor.
- Ensure Positive Drainage: All hardscape surfaces must slope away from buildings at a rate of 1-2% (a minimum of 1/8 inch drop per foot). This prevents water from pooling against your home's foundation.
- Reinforce Structures: For retaining walls, install a perforated drain pipe behind the base to relieve hydrostatic pressure. Concrete patios should be at least 4 inches thick and reinforced with #4 rebar to prevent cracking.
Key Insight: Don’t mistake sand for a base. Sand is a leveling agent, not a structural foundation. Placing pavers on a thin layer of sand over uncompacted soil is the number one cause of sinking and shifting. A compacted crushed rock base is non-negotiable for longevity.
When to Call a Hardscape Professional
While laying a few stepping stones is a manageable DIY task, any project involving significant excavation, structural loads, or complex drainage is best left to licensed professionals. A professional installation should last 20-40 years, whereas a typical DIY job fails in 5 years or less. Contractors certified by the Interlocking Concrete Pavement Institute (ICPI) or the California Landscape Contractors Association have the expertise and heavy equipment to guarantee a stable, long-lasting build. They can navigate permits, ensure proper soil compaction, and design integrated drainage systems. You can learn more about building outdoor spaces that last and why a professional approach protects your investment.
5. Plant Selection Mismatch with Climate, Sun Exposure, and Water Availability
Choosing plants based on looks alone, without considering the local environment, is one of the most common ways homeowners stop diying their yard wrong. This mistake guarantees frustration, as plants ill-suited for California's Mediterranean climate will struggle, demand excessive resources, and often die within a few seasons. Placing shade-loving plants in full sun or installing a water-hungry lawn in a drought-prone zone are classic examples of setting yourself up for failure. This approach leads to weak, pest-prone plants and wasted money.
For instance, a Salinas homeowner might plant beautiful hydrangeas in a backyard that gets blistering afternoon sun. Despite constant watering, the leaves will bleach and scorch, and the plants will decline within two years. Similarly, planting a Coast Live Oak in a frost-prone inland area without protection can kill it in the first freeze, whereas a native Valley Oak would have easily thrived. Proper plant selection is the foundation of a sustainable, low-maintenance landscape, ensuring up to 95% plant survival and cutting water use by over 50%.
The Corrective Approach: Right Plant, Right Place
The solution is to assess your site’s specific conditions before buying a single plant. This "right plant, right place" philosophy involves matching plants to your yard's unique microclimate, sun exposure, and soil, creating a thriving garden that works with nature, not against it.
- Conduct a Site Assessment: Spend time observing your yard. Map out areas of full sun (6+ hours), part shade (3-6 hours), and full shade (under 3 hours). Test your soil's type and how well it drains; poor drainage is a common issue, and seeking expert drainage solutions for yards can prevent root rot and other water-related problems.
- Select Climate-Appropriate Plants: Use resources like the UC Davis 'Landscape Plants for the Bay Area' list or the California Native Plant Society guides. Choose species rated for your specific hardiness zone.
- Group Plants by Water Needs (Hydrozoning): Place thirsty plants like turfgrass or annual flowers in one area and group drought-tolerant natives and Mediterranean plants in another. This allows you to water each zone efficiently.
Key Insight: Don’t forget to plan for mature size. A small sapling planted too close to a walkway or foundation can become a major structural problem in a decade. Research the mature height and spread of every plant to avoid overcrowding and future removal costs.
When to Call a Landscape Designer
While picking a few plants at a nursery is a fun DIY project, creating a cohesive, water-wise, and multi-season garden plan is a professional skill. If you are landscaping a new property, renovating an entire yard, or dealing with challenging conditions like steep slopes or poor soil, a landscape designer is invaluable. They understand how to create a unified design that considers Monterey County's specific microclimates, from coastal fog in Pacific Grove to the inland heat of a Salinas valley. A professional ensures your plant investment thrives for years, saving you from the costly cycle of plant replacement.
6. Tree Removal and Stump Grinding Incomplete, Creating Safety and Aesthetic Problems
Among the most hazardous DIY projects, amateur tree removal stands out as a critical mistake that can lead to catastrophic consequences. Felling a tree is a complex and dangerous process that, when done incorrectly, leaves behind more than just an eyesore. This is why it’s a non-negotiable point in any guide on how to stop diying your yard wrong. Homeowners attempting this task often misjudge the physics of the fall, causing trees to damage property, strike power lines, or create "widowmakers" – broken limbs left hanging precariously. Furthermore, incomplete removal that leaves the stump and root system creates ongoing problems with pests, disease, and unwanted regrowth.
Consider a scenario in Salinas where a homeowner partially cuts a 50-foot Monterey Pine, only for it to lean dangerously over their house, creating a constant hazard and requiring a far more expensive ($3,500+) emergency removal. In another case, a DIY attempt damages a power line, leading to a neighborhood outage and a staggering $25,000 liability claim. Even leaving a stump behind can turn into a serious issue; it can sprout new, weak growth or become a thriving nest for carpenter ants and termites that can eventually migrate to your home.
The Corrective Approach: Ensuring Complete and Safe Removal
Proper tree and stump removal is a start-to-finish process handled by licensed, insured professionals who prioritize safety and site restoration. It involves careful planning, specialized equipment, and adherence to local regulations to eliminate all hazards and aesthetic issues.
- Plan and Permit: Before any work begins, professionals will assess the site, check with the local city or county for necessary tree removal permits, and contact 811 to locate all underground utilities, preventing costly damage.
- Use the Right Equipment: Certified arborists use equipment like cranes for controlled lowering of large sections, industrial chippers for debris management, and powerful stump grinders to pulverize the stump and major roots well below ground level.
- Ensure Full Site Restoration: A professional job isn't done until the stump is gone, the resulting hole is filled with soil and chips, all debris is hauled away, and the site is left clean and ready for its next use, whether that’s replanting or hardscaping.
Key Insight: A written estimate from a professional should be comprehensive. Insist that it details not just the felling of the tree but also complete stump removal or grinding, debris hauling, and final site cleanup. This prevents hidden costs and ensures the job is fully completed.
When to Call a Certified Arborist
Tree removal is not a DIY project. The potential for property damage, serious injury, or even death is extremely high. If you need a tree removed-especially one near structures or power lines-the only safe option is to hire a professional. Verify that any contractor you consider has ISA certification, a minimum of $1 million in liability insurance, and valid workers' compensation. Scheduling removal during non-emergency periods can often be more cost-effective. A qualified arborist not only removes the hazard but can also advise on suitable replacement trees for your Monterey Bay landscape, turning a problem into a new opportunity.
7. Landscape Design Without Professional Plan, Resulting in Poor Layout and Functionality
Jumping into a landscape project without a professional plan is like building a house without a blueprint. Many homeowners make this mistake, resulting in a yard that looks disjointed and fails to meet their needs. This approach is a key reason people find themselves diying their yard wrong. Without a cohesive vision, you get awkwardly placed planting beds, patios that are too small for entertaining, and a general lack of flow that diminishes both usability and property value. The result is often wasted space and missed opportunities to solve real-world problems like drainage, poor views, or intense sun exposure.
For instance, a Salinas homeowner might add a small, disconnected patio in a sunny spot without considering its relationship to the house or how it will be used for gatherings. A few years later, they spend an additional $8,000 to expand it, a cost that could have been integrated more efficiently from the start. Another common error is failing to assess a slope. A DIY design on a sloped Monterey property might lead to serious drainage issues, channeling water toward the home's foundation. A professional plan would have incorporated a functional and attractive retaining wall and proper grading from the beginning.
The Corrective Approach: Designing for Cohesion and Functionality
A professional landscape design is an investment that pays for itself by creating a cohesive, functional, and beautiful outdoor space. The process starts with a thorough site analysis to identify challenges and opportunities, followed by a detailed master plan that reflects your lifestyle and goals. Studies by the American Society of Landscape Architects (ASLA) confirm that professional landscaping can increase property value by 5-12%.
- Start with a Master Plan: Hire a landscape architect or designer to conduct a site analysis and create a comprehensive plan. This initial investment (often $1,500-$3,000) prevents costly mistakes and ensures the final result is exactly what you want.
- Request Digital Visualization: Ask for digital renderings or 3D models. Seeing the design visually before any ground is broken helps you confirm that the layout, scale, and materials are right for your space.
- Define Your Priorities: Clearly communicate how you intend to use the space: entertaining, family play, relaxation, or gardening. A good designer will use this information to create defined "zones" for each activity.
- Plan for Phased Implementation: A master plan doesn't mean you have to do everything at once. Ask for a phased plan that allows you to execute the project over time as your budget allows, while still working toward a unified vision.
Key Insight: A successful landscape design does more than just look good; it solves problems. It should address grading issues, screen unwanted views, create privacy, and incorporate water-wise solutions like native plants and efficient irrigation, especially crucial in water-conscious areas like Monterey County.
When to Call a Landscape Designer
While adding a few plants to an existing flower bed is a simple DIY task, any project involving hardscaping, significant grading, or a complete yard overhaul demands professional expertise. If you are planning a patio, retaining wall, outdoor kitchen, or comprehensive planting scheme, a landscape designer or a design-build firm is essential. They possess the technical knowledge of materials, plant communities, and construction standards needed to create a safe, sustainable, and valuable outdoor living area. A professional ensures your project moves smoothly from vision to value, creating smarter landscape choices for lasting beauty and function.
8. Neglecting Seasonal Maintenance and Year-Round Property Care Leading to Decline
One of the most common ways homeowners unknowingly DIY their yard wrong is by adopting an "install and forget" mentality. A beautiful landscape is not a static object; it's a living system that requires consistent attention to thrive. Neglecting seasonal maintenance means failing to perform crucial tasks like pruning, fertilizing, pest management, and cleanup. This oversight allows a landscape to slowly decline, as plants become overgrown, pest pressure increases, and irrigation systems fail, eroding both property value and curb appeal.
This gradual decay often leads to expensive, reactive fixes. For example, a homeowner in Salinas might ignore their lawn for two years, only to find it's a weedy eyesore requiring a $3,000 renovation, a problem that could have been prevented with a $500 annual maintenance plan. Similarly, failing to check for pest pressure in the spring could allow an aphid infestation to explode by summer, demanding a $2,000 treatment instead of a $200 early intervention. Neglect is rarely the cheaper option in the long run.
The Corrective Approach: Establishing a Year-Round Maintenance Schedule
Proactive care is the key to preserving your landscape investment and preventing costly emergencies. California's Mediterranean climate has distinct needs for each season, from spring renewal and summer water management to fall cleanup and preparing for winter storms. A structured, year-round schedule keeps your property healthy, safe, and beautiful.
- Schedule Quarterly Inspections: Walk your property once each season (spring, summer, fall, winter) to spot issues like broken sprinklers, early signs of disease, or overgrown branches.
- Time Your Pruning: Prune spring-flowering shrubs like azaleas right after they bloom (April-May). For plants that bloom in summer or fall, such as crepe myrtles, prune during the dormant winter season.
- Manage Water Wisely: Inspect your irrigation system monthly for leaks or clogs. Adjust your controller settings 3-4 times per year to match seasonal water needs, reducing waste and stress on plants.
- Perform Seasonal Cleanups: Rake and remove fallen leaves in the fall to prevent them from smothering turf and harboring pests. Before the winter storm season (August-September), inspect trees for dead or hazardous branches.
Key Insight: The cost of prevention is almost always a fraction of the cost of repair. An $800 annual pruning investment to balance a tree is far more affordable than the $15,000 in damages it could cause if it topples during a storm. Consistent care protects your financial investment and your peace of mind.
When to Call a Landscape Maintenance Professional
While DIY monthly inspections and minor cleanups are manageable, a comprehensive maintenance plan benefits from professional expertise. If you lack the time, tools, or knowledge to handle seasonal pruning, fertilization, and irrigation adjustments, a professional service is a wise investment. They can spot subtle signs of pest and disease issues early, ensure your irrigation is optimized for local water restrictions, and perform critical safety checks. A professional can also help you learn how to weather-proof your yard in Salinas or Monterey before the rainy season arrives, a crucial step for protecting your home and property.
Frequently Asked Questions (FAQs)
What is the single biggest DIY mistake homeowners make in their yards?
The most common and often costliest mistake is improper water management, whether through a poorly designed irrigation system or incorrect watering habits. This wastes water, a precious resource in California, and leads to plant death, fungal diseases, and foundation issues.
How can I save money on my landscape project without making these mistakes?
The smartest way to save is by investing in a professional master plan upfront. A good design prevents costly errors, helps you phase the project over time to match your budget, and ensures the final result increases your property value. For implementation, you can DIY smaller, non-structural tasks like planting annuals or spreading mulch while leaving complex jobs like hardscaping and tree work to pros.
Is professional landscaping really worth the investment in the Salinas/Monterey area?
Yes. According to the American Society of Landscape Architects (ASLA), professional landscaping can increase property value by 5-12%. In a competitive real estate market like Monterey County, a well-designed, water-wise, and functional outdoor space is a significant selling point and enhances your quality of life.
What’s a simple soil amendment I can do myself?
For most soil types in our area, adding high-quality organic compost is the single best thing you can do. Spread a 2-3 inch layer over your planting beds and gently work it into the top 6-8 inches of soil before planting. This improves soil structure, water retention, and nutrient availability.
How do I know if I need a permit for my yard project in Salinas or Monterey County?
Permit requirements vary by city and project scope. Generally, you will need a permit for retaining walls over 4 feet tall (or shorter walls carrying a surcharge), large patios, decks over 30 inches high, and significant tree removals (especially "heritage" trees). Always check with your local city planning department before starting any structural work.
Build It Right the First Time with Professional Guidance
After exploring the common pitfalls of DIY yard work, a clear picture emerges: your landscape is a complex, living system. It’s far more than just soil, plants, and stone. From the hidden network of a tree’s root system to the precise grading required for patio drainage, every component is interconnected. Making a mistake in one area, such as improper pruning or a poorly designed irrigation system, can set off a chain reaction of expensive and frustrating problems.
The temptation to save money by doing it yourself is powerful, but as we've detailed, many of these projects come with hidden costs. A weekend project to "fix" a leaning tree can become a liability, a simple patio installation can lead to foundation water damage, and a mismatched plant choice can result in a garden that never thrives. The key takeaway from this guide is not to discourage your involvement but to encourage a smarter, more strategic approach. You can absolutely stop DIYing your yard wrong by understanding the limits of your own expertise and recognizing when professional intervention is an investment, not just an expense.
If you're planning an outdoor living upgrade in the Salinas or Monterey Bay area, our team can help you design and build it the right way the first time. Contact us at California Landscape & Tree Pros to ensure your project is a lasting success. Visit us at California Landscape & Tree Pros to schedule a consultation.